Tutorial: A natural language interface for the IIoT with MCP and Apache StreamPipes

Introduction
The new Model Context Protocol (MCP) lets large-language-model apps call out to local or remote “servers” that expose tools and resources in a structured, JSON-schema-driven way.
In this blog post, we’ll build a simple MCP server that wraps the Apache StreamPipes Java client and exposes some of its functionality to Claude Desktop. This MCP server will allow tools like Claude Desktop to query StreamPipes for available adapters, start pipelines, and more, all through natural language commands.
In this post you’ll learn how to:
- Write a Spring Boot MCP server that wraps the StreamPipes Java client and exposes tools for various StreamPipes operations.
- Package the server into a runnable JAR.
- Register that JAR in claude_desktop_config.json so Claude can query or start StreamPipes pipelines with natural language.
Model Context Protocol (MCP)
MCP is a protocol designed to enable large language models (LLMs) to interact with external systems and services in a structured way. It allows LLMs to call functions, retrieve data, and perform actions by defining a set of tools that can be invoked with natural language commands.
MCP (introduced by Anthropic in late 2024) defines a tiny message format—over stdin/stdout, sockets or HTTP, so that any LLM agent can discover tools, validate parameters and execute them with the user’s permission.
Why StreamPipes and MCP?
Apache StreamPipes is our open-source framework for processing and analyzing streaming data from industrial data sources such as PLCs, sensors, and IoT devices. It provides a user-friendly interface for building data pipelines, integrating various data sources, and applying analytics in real-time.
Under the hood, StreamPipes offers many APIs to interact with industrial data sources, pipelines for processing and analytics. In addition, StreamPipes offers several client libraries in different programming languages, including a Java client that allows developers to interact with StreamPipes instances programmatically.
In this experiment, we’ll create a simple MCP server that wraps the StreamPipes Java client, exposing its functionality to Claude Desktop or other MCP clients. By using MCP, we can leverage the power of StreamPipes while providing a natural language interface for users to interact with their data pipelines.
For example, users could ask the following questions:
- "List all pipelines that are currently running in StreamPipes."
- "Start the flow rate monitoring pipeline."
- "What adapters are available in my StreamPipes instance?"
- "Create a chart comparing flow rate and temperature from the flow rate monitoring pipeline."
Many more commands are possible, and the MCP server can be extended to support additional functionality as needed, but in this blog post, we’ll focus on a few key commands to demonstrate the concept.
Pre-requisites
- Java (17 or higher) and Maven installed on your machine
- An Apache StreamPipes instance running (you can use the StreamPipes Docker image for local development)
- Claude Desktop or any other MCP client
Project setup
We assume you have StreamPipes already running, either locally or on a remote server.
In this example, we'll create a standalone Spring Boot application that serves as the MCP server. The application communicates with the StreamPipes instance using the StreamPipes Java client.
Create a new Maven project with the following structure:
<project xmlns="http://maven.apache.org/POM/4.0.0"
         xmlns:xsi="http://www.w3.org/2001/XMLSchema-instance"
         xsi:schemaLocation="http://maven.apache.org/POM/4.0.0 http://maven.apache.org/xsd/maven-4.0.0.xsd">
    <modelVersion>4.0.0</modelVersion>

    <groupId>ai.bytefabrik</groupId>
    <artifactId>streampipes-mcp-server-example</artifactId>
    <version>1.0-SNAPSHOT</version>

    <properties>
        <streampipes.version>0.98.0-SNAPSHOT</streampipes.version>
        <spring-ai.version>1.0.0</spring-ai.version>
        <maven-compiler-plugin.version>3.10.1</maven-compiler-plugin.version>
    </properties>

    <dependencies>
        <dependency>
            <groupId>org.apache.streampipes</groupId>
            <artifactId>streampipes-client</artifactId>
            <version>${streampipes.version}</version>
            <exclusions>
                <exclusion>
                    <groupId>commons-logging</groupId>
                    <artifactId>commons-logging</artifactId>
                </exclusion>
            </exclusions>
        </dependency>
        <dependency>
            <groupId>org.springframework.ai</groupId>
            <artifactId>spring-ai-starter-mcp-server-webmvc</artifactId>
            <version>${spring-ai.version}</version>
            <exclusions>
                <exclusion>
                    <groupId>io.micrometer</groupId>
                    <artifactId>micrometer-core</artifactId>
                </exclusion>
            </exclusions>
        </dependency>
    </dependencies>

    <repositories>
      <repository>
        <id>apache-snapshots</id>
        <url>https://repository.apache.org/snapshots</url>
        <releases>
          <enabled>false</enabled>
        </releases>
        <snapshots>
          <enabled>true</enabled>
          <updatePolicy>always</updatePolicy>
        </snapshots>
      </repository>
    </repositories>

    <build>
        <plugins>
            <plugin>
                <groupId>org.apache.maven.plugins</groupId>
                <artifactId>maven-compiler-plugin</artifactId>
                <version>${maven-compiler-plugin.version}</version>
                <configuration>
                    <source>17</source>
                    <target>17</target>
                    <encoding>UTF-8</encoding>
                </configuration>
            </plugin>
            <plugin>
                <groupId>org.springframework.boot</groupId>
                <artifactId>spring-boot-maven-plugin</artifactId>
                <executions>
                    <execution>
                        <goals>
                            <goal>repackage</goal>
                        </goals>
                        <configuration>
                            <mainClass>ai.bytefabrik.streampipes.mcp.StreamPipesMcpExampleApplication</mainClass>
                        </configuration>
                    </execution>
                </executions>
            </plugin>
        </plugins>
        <finalName>streampipes-mcp-server</finalName>
    </build>
</project>
We pull in two dependencies: streampipes-client for the StreamPipes Java client, spring-ai-starter-mcp-server-webmvc for the MCP server functionality.
In case you only want to use the MCP server in stdio mode, you can use spring-ai-starter-mcp-server instead.
Note that we've also included the Apache StreamPipes snapshot repository, to make sure we use the latest version of the StreamPipes client which has support for getting adapter information.
Code
Main Application Class
Now let's create the main application class that will serve as the entry point for our MCP server.
package ai.bytefabrik.streampipes.mcp;


@SpringBootApplication
public class StreamPipesMcpExampleApplication {

  public static void main(String[] args) {
    SpringApplication.run(StreamPipesMcpExampleApplication.class, args);
  }

  @Bean
  public List<ToolCallback> toolCallbacks() {
    var client = makeClient();
    return List.of(
        ToolCallbacks.from(new PipelineTool(client)),
        ToolCallbacks.from(new AdapterTool(client))
    );
  }

  private IStreamPipesClient makeClient() {
    var host     = System.getenv("STREAMPIPES_HOST");
    var port     = Integer.parseInt(System.getenv("STREAMPIPES_PORT"));
    var username = System.getenv("STREAMPIPES_USERNAME");
    var apiKey   = System.getenv("STREAMPIPES_API_KEY");
    var httpsOff = Boolean.parseBoolean(
        Optional.ofNullable(System.getenv("STREAMPIPES_HTTPS_DISABLED"))
                .orElse("false"));
    return StreamPipesClient.create(
        host, port,
        StreamPipesCredentials.withApiKey(username, apiKey),
        httpsOff);
  }
}
In this class, we define two tools: PipelineTool and AdapterTool, which will handle operations related to StreamPipes pipelines and adapters, respectively.
In addition, we create a StreamPipes client using the makeClient() method, which retrieves the necessary configuration from environment variables.
Tool Classes
Next, we need to implement the PipelineTool and AdapterTool classes that will define the functionality exposed by our MCP server.
Spring AI makes it ease to define tools by providing a @Tool annotation that allows us to specify the tool's name, description, and input/output parameters if required.
Let's take a look at the PipelineTool class first:
public class PipelineTool {

  private final IStreamPipesClient client;

  public PipelineTool(IStreamPipesClient client) {
    this.client = client;
  }

  @Tool(
      name = "get_all_pipelines",
      description = "Get all available StreamPipes pipelines"
  )
  public List<Pipeline> getPipelines() {
    return client.pipelines().all();
  }

  @Tool(
      name = "get_pipeline_by_id",
      description = "Given the ID of a pipeline, return a detailed description of the pipeline"
  )
  public Pipeline getPipelineById(String id) {
    return client.pipelines()
        .get(id)
        .orElseThrow(() -> new IllegalArgumentException(String.format("Could not find pipeline with id %s", id)));
  }

  @Tool(
      name = "start_pipeline",
      description = "Start the pipeline with the given ID"
  )
  public void startPipeline(String id) {
    var pipeline = getPipelineById(id);
    client.pipelines().start(pipeline);
  }
}
Since the StreamPipes client already provides methods to interact with pipelines, we can directly use those methods in our tool implementation. In this example, we define three tools to get all pipelines, get a pipeline by ID, and start a pipeline by ID. We added few more tools to stop pipelines and to interact with adapters, which can be find in our example repository on GitHub.
application.yaml
Next, we need to configure our MCP server by creating an application.yaml file in the src/main/resources directory:
logging:
  pattern:
    console:
spring:
  main:
    banner-mode: off
application:
  name: streampipes-mcp-example
ai:
  mcp:
    server:
      name: bytefabrik-streampipes-mcp-server
      version: 0.1.0
      enabled: true
      stdio: true
By default, Spring AI will run the MCP server in stdio mode, which means it will read commands from standard input and write responses to standard output. Stdio requires that logging and banner mode are set to empty and off, respectively, to avoid any interference with the MCP protocol.
By pulling in the spring-ai-starter-mcp-server-webmvc dependency, we automatically get the MCP server functionality.
This means, once we run the application, it will start listening for MCP commands on standard input, but will also spin up a web server that can be used to interact with the MCP server via HTTP and SSE.
Building the MCP Server
To build the MCP server, we use Maven to package the application into a runnable JAR file.
Running mvn clean package will create a JAR file in the target directory named streampipes-mcp-server.jar.
Generating an API key
To generate an API key for your StreamPipes instance, you can use the StreamPipes UI or the Bytefabrik Platform UI. Navigate to "Profile -> Settings -> API Keys" and create a new API key.
Copy the API key - we'll need it in a second!
Using the MCP server with Claude Desktop
We'll first show how to use the MCP server using stdio with Claude Desktop.
In Claude Desktop, open the Settingsand navigate to Developer.
When clicking on Edit configuration, you can add the following configuration to the claude_desktop_config.json file:
{
  "mcpServers": {
    "bytefabrik-streampipes-mcp-server": {
      "env": {
        "STREAMPIPES_HOST": "localhost",
        "STREAMPIPES_PORT": "8082",
        "STREAMPIPES_USERNAME": "admin@streampipes.apache.org",
        "STREAMPIPES_API_KEY": "your_api_key_here",
        "STREAMPIPES_HTTPS_DISABLED": "true"
      },
      "command": "java",
      "args": [
        "-jar",
        "path_to/streampipes-mcp-server.jar"
      ]
    }
  }
}
Copy your API key from the previous step and replace your_api_key_here with it.
In addition, you might need to adjust host, port and username to match your StreamPipes instance.
Restart Claude Desktop to apply the changes and make sure no errors are shown upon startup.
Now let's start to have fun!
Navigate to the chat window and try the following:
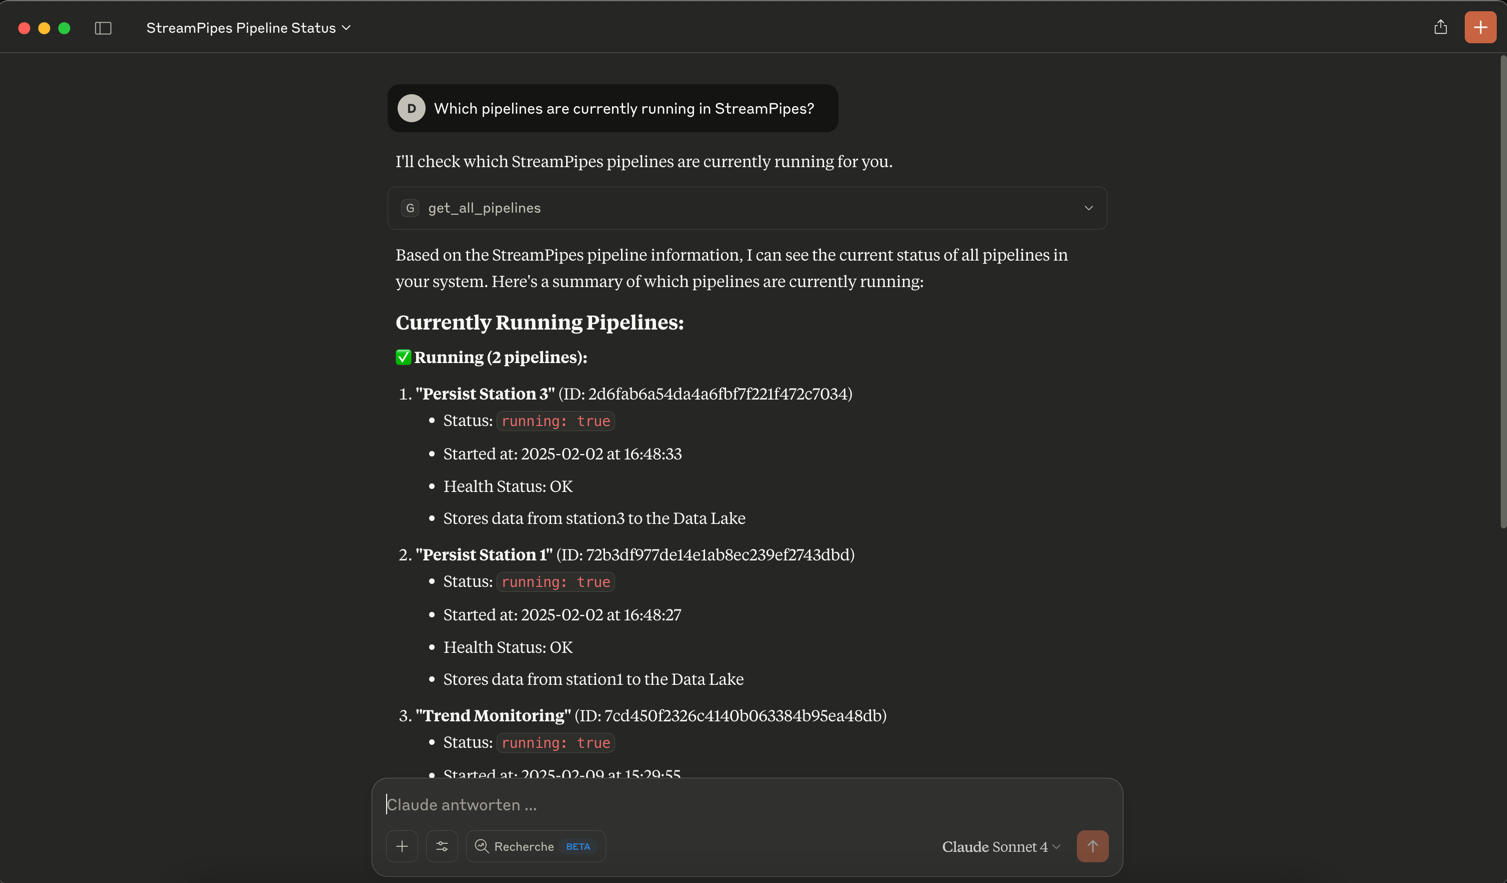
List all pipelines that are currently running in StreamPipes.
Claude will respond with a description of all pipelines that are currently running in your StreamPipes instance.
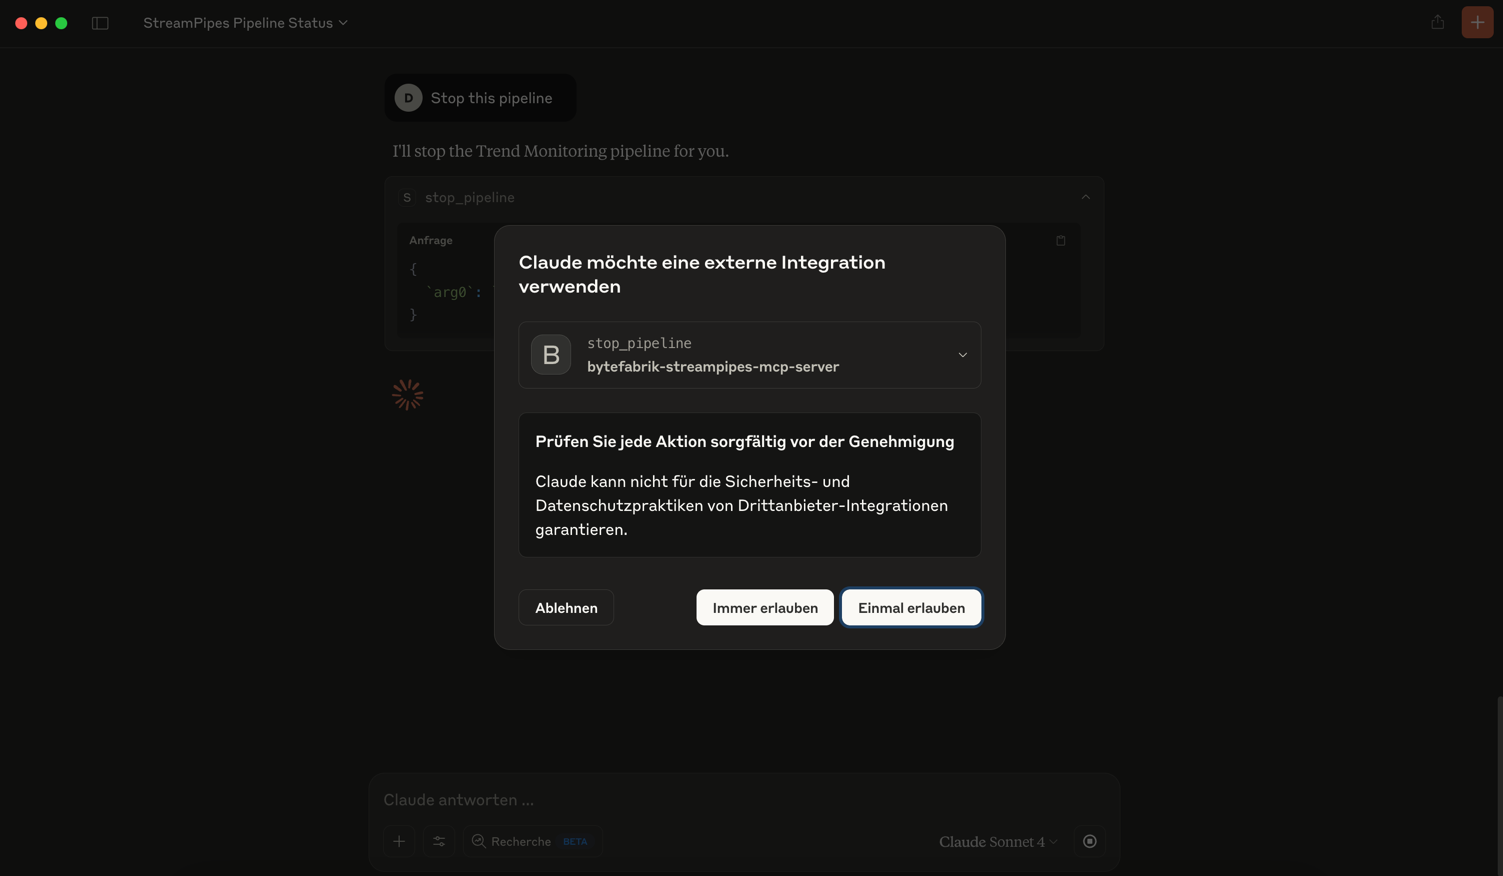
If you're using the MCP server for the first time, Claude will ask you to allow access to the StreamPipes tools:
Let's ask Claude to explain a specific pipeline:
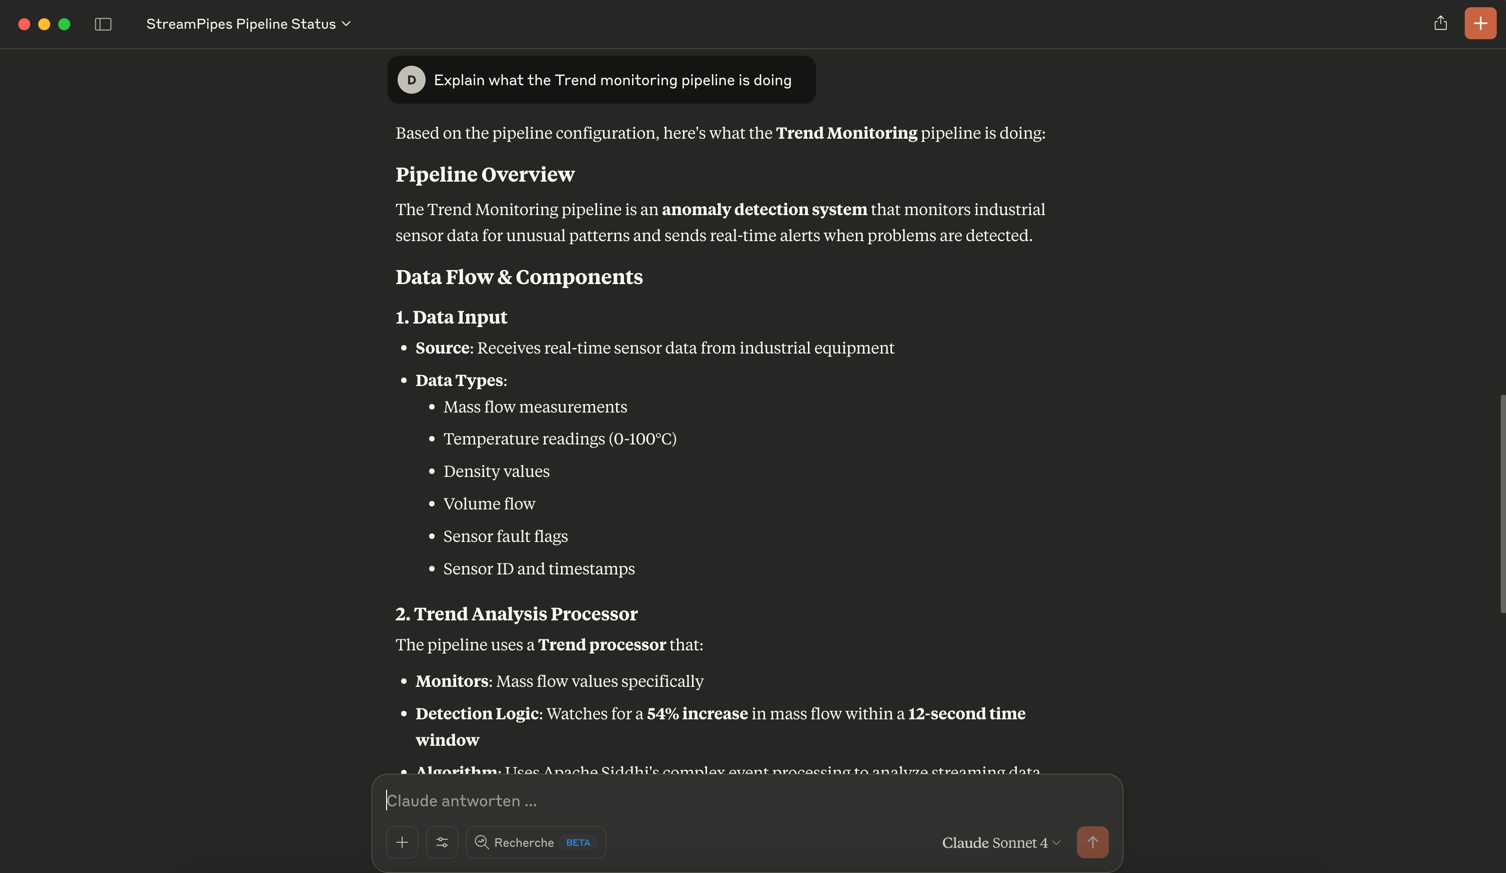
Great! We see a nice description of the pipeline, including the data sources, the configuration of all processors and sinks and the current status.
What about performing actions? Stop a pipeline directly from Claude by referring to the pipeline name.
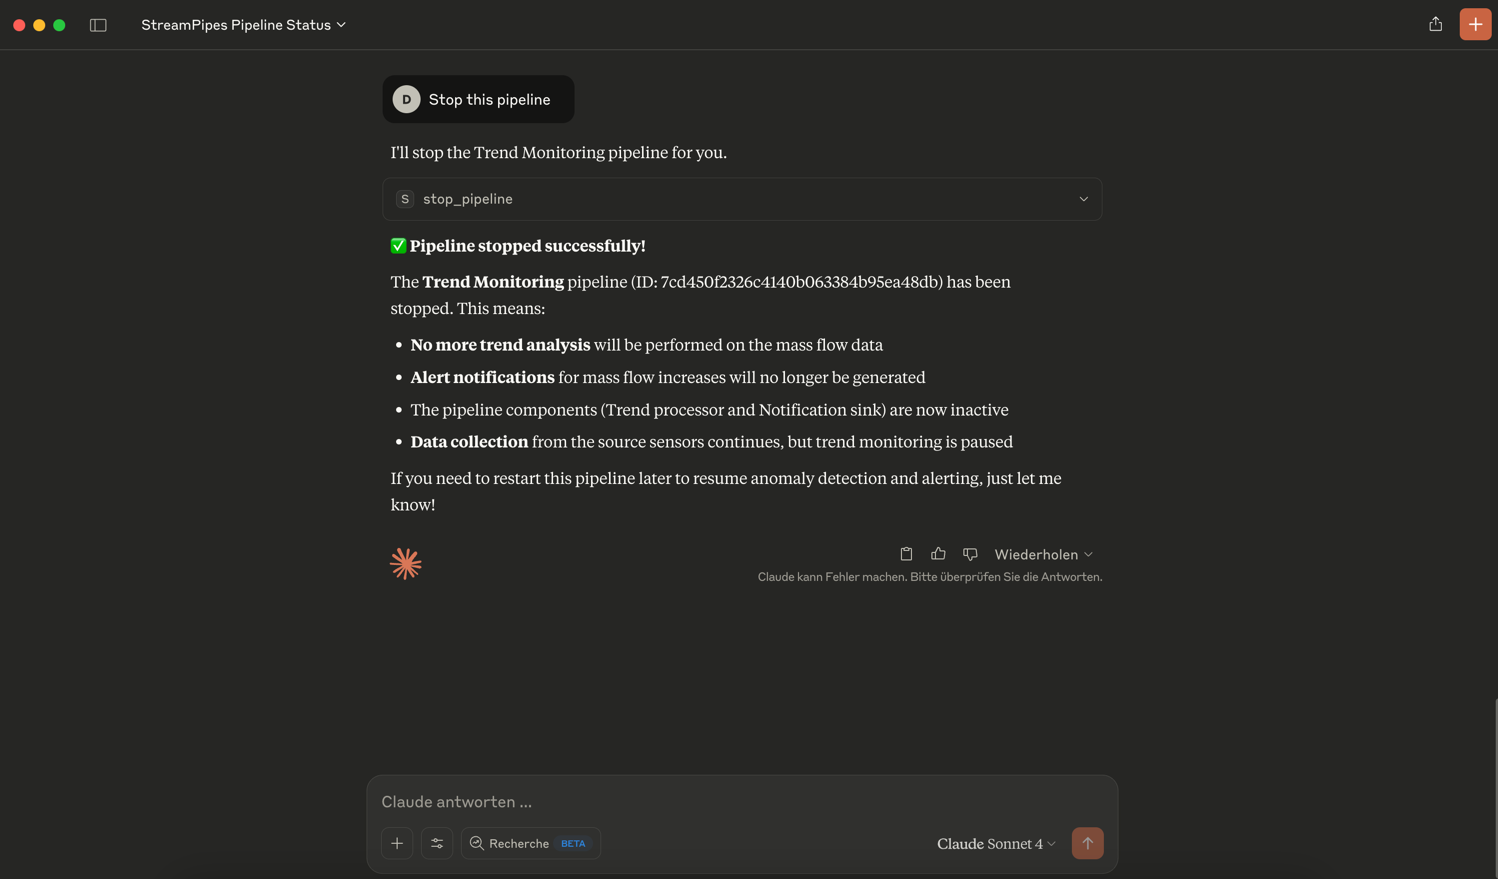
Claude automatically looks up the pipeline ID and stops the pipeline for you.
There are many more things you can try - like performing actions on adapters. Investigate the StreamPipes documentation to find out more about possible commands.
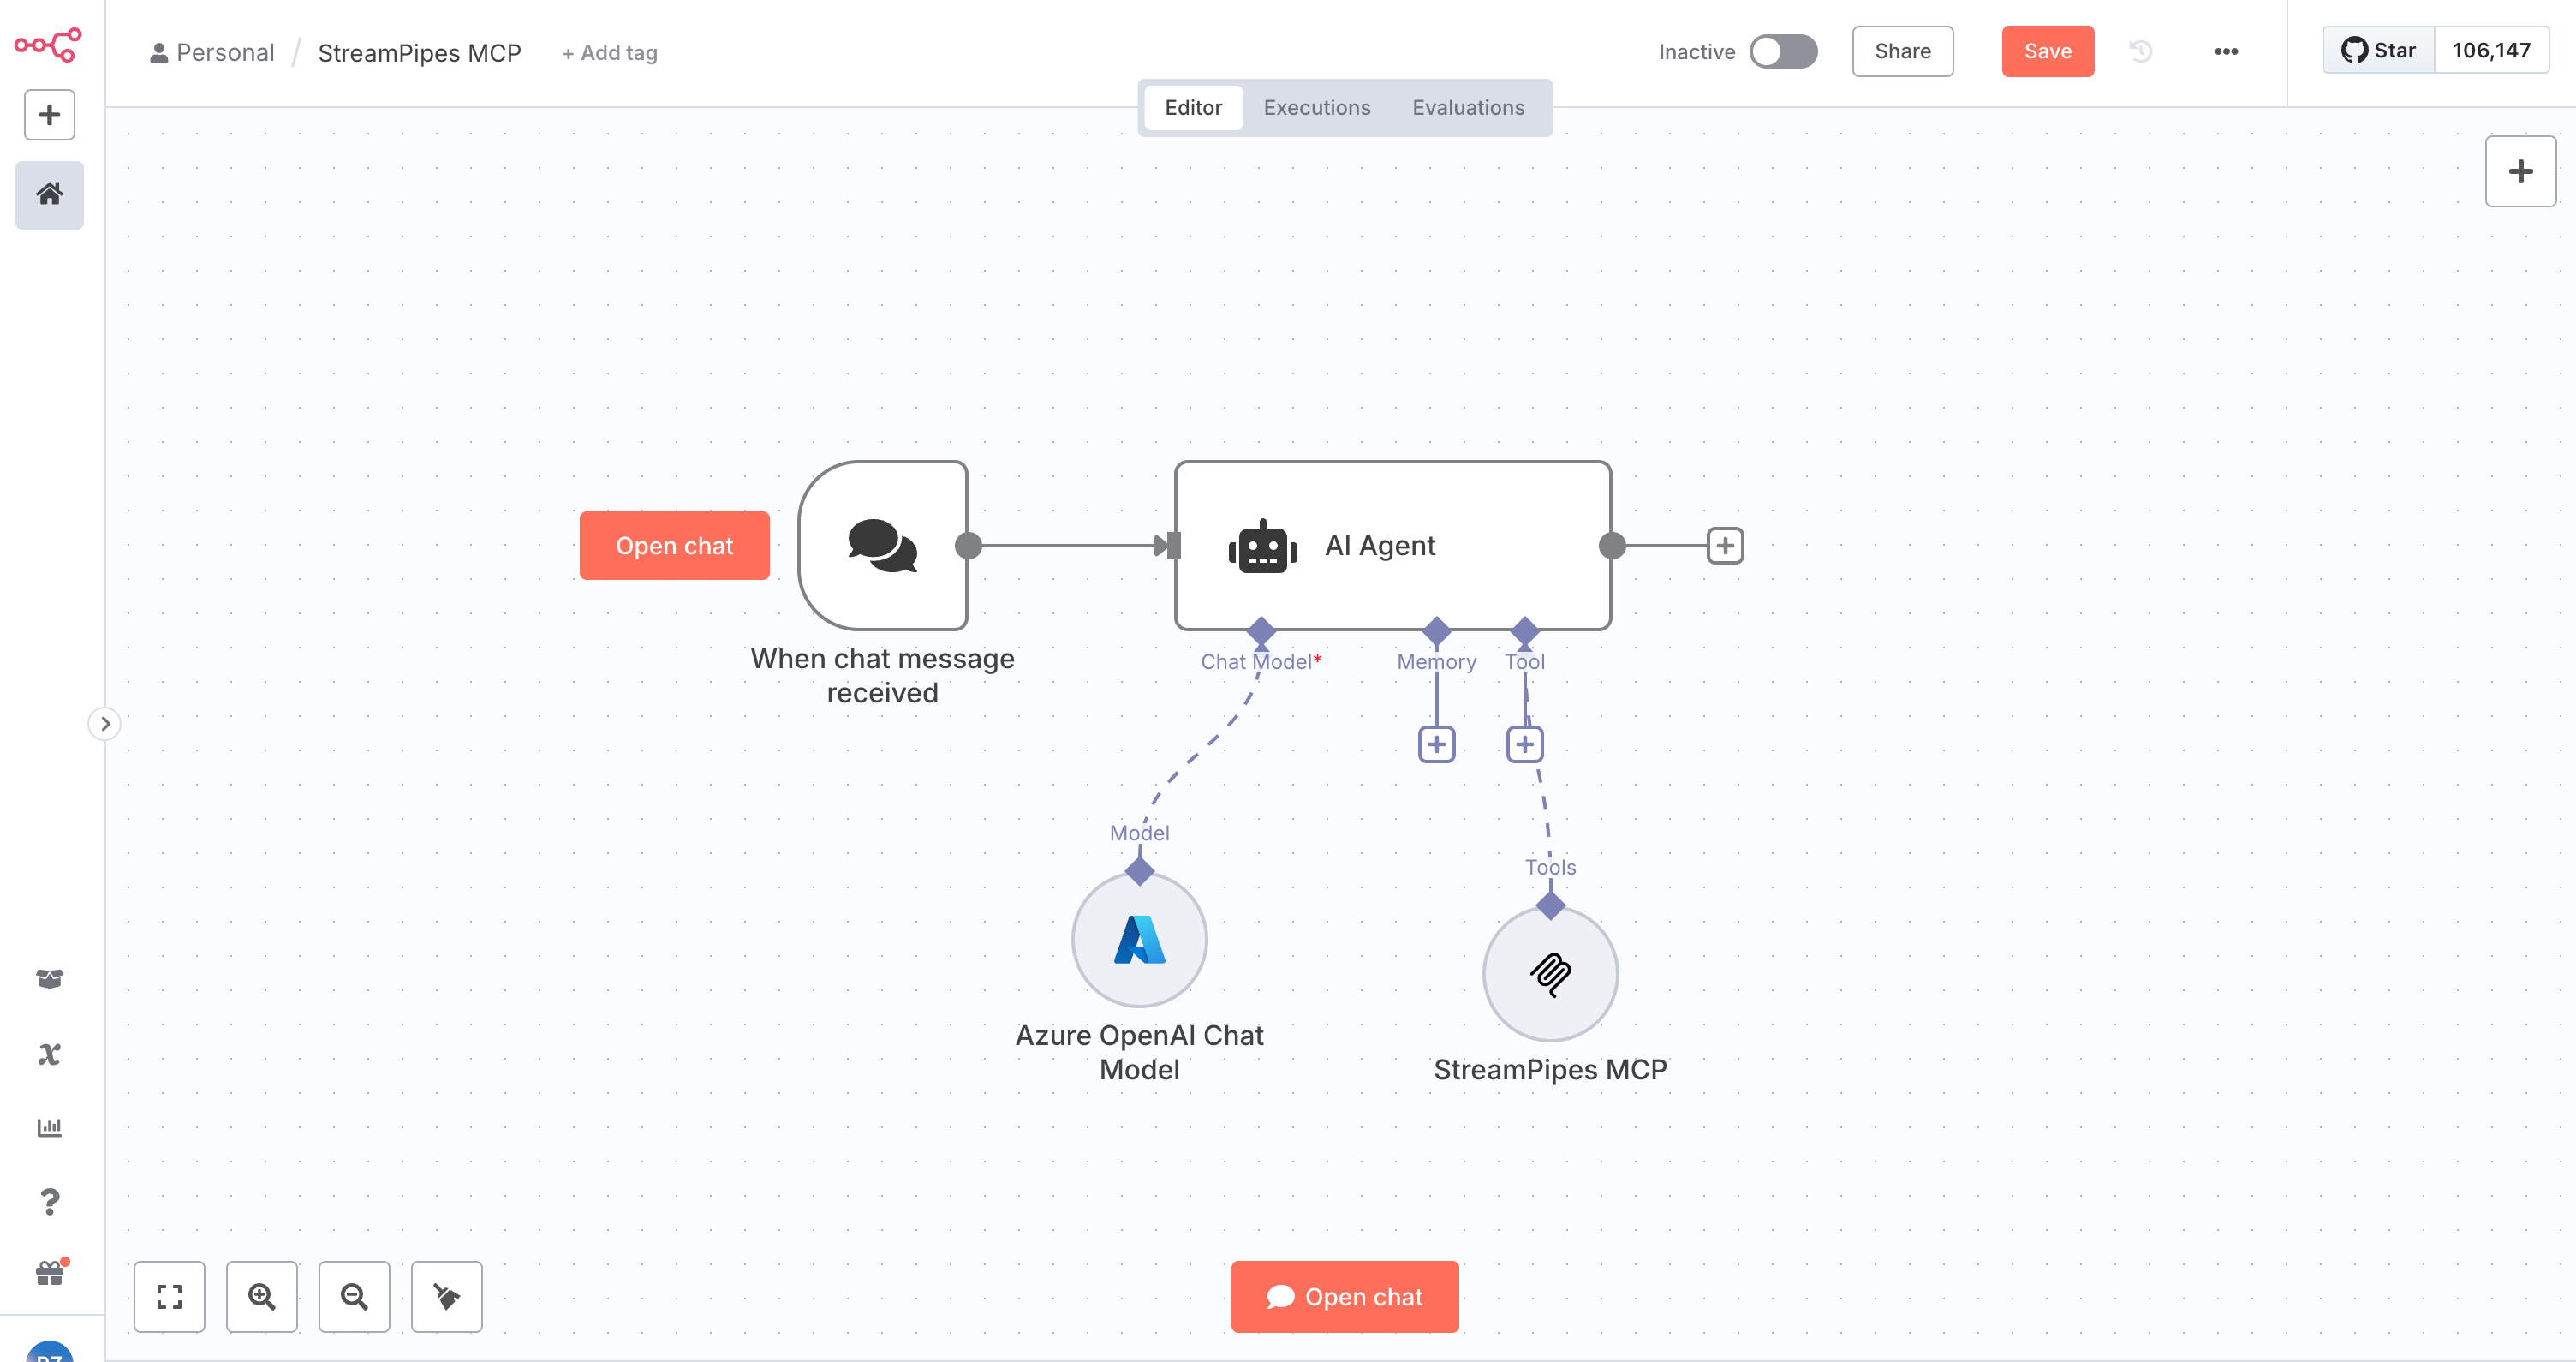
Using the MCP server with n8n
So far, we've used stdio mode to interact with the MCP server. Now let's see how we can use the MCP server in n8n, a popular open-source workflow automation tool.
First, we need to start the MCP server we created earlier. Run it using the following command:
java -jar target/streampipes-mcp-server.jar
By default, the MCP server will listen on port 8080.
To integrate the MCP server with n8n, we need to configure n8n to use the StreamPipes MCP server.
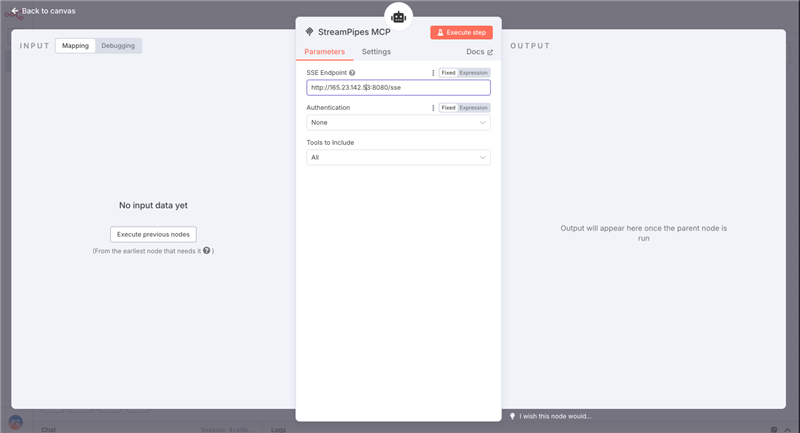
Add a new "MCP Client Tool" as a tool. Configure the MCP client tool with the IP and port of your StreamPipes MCP server, e.g., http://localhost:8080.
Now you can use the StreamPipes MCP server in n8n to interact with your StreamPipes instance!
Outlook
The Model Context Protocol (MCP) is a powerful way to extend the capabilities of large language models like Claude Desktop by allowing them to interact with external systems and services.
In this blog post, we demonstrated how to create a simple MCP server that wraps the Apache StreamPipes Java client, exposing its functionality to Claude Desktop and n8n.
Are you interested in seeing more functionality in the MCP server? Let us know!